The Importance of Backing Up Automate Data
If you've ever been in a situation in which you've almost completed an important assignment or project, only to have your computer suddenly crash seconds before pressing the Save button, you understand how frustrating losing your data can be. Now, imagine losing all your important Automate tasks - ones that perform vital business or IT processes, execute complex routines and complete day to day operations, or tasks that may even perform routine automated backups of essential company data. The fact is, most of us do not take data backup seriously and only think about it once we face a catastrophic situation. And although many of us choose to adhere to the chant of "it'll never happen to me", the reality is, it could. And as computers continue to become the standard way in which many businesses conduct important transactions and deliver core services, this type of idea is becoming increasingly risky.
In this article we will take a look at the importance of backing up Automate data in order to prevent data loss. We will also learn how to go about backing up remote Automate installations, performing automatic backup and achieving data recovery in case data loss occurs despite the best of our efforts and precautions.
Overview
A couple of important yet infrequently used features encompassed in Automate 7 are its Backup and Restore functions. The Backup feature is capable of saving backup copies of managed tasks, triggers, and system data onto Automate archive (.AMA) files. These backup copies may later be used by the Restore feature in order to restore the original in case a data loss event occurs.
Backup & Restore Preferences
Automate backups can be performed manually using the Backup option located in the System menu of the Task Administrator. With the Automate Premium version, remote Runtime installations can be backed up manually as well. You simply need to connect to the desired Runtime component and select System -> Backup.
For further optimization, backups can also be performed in an automated fashion using the Backup Automate action. With this capability, you can easily create a non-complex task that contains a single step that backs up your Automate data and attach a Schedule Trigger to execute the task on schedule. The task can also be sent to one or more remote Runtime installations by simply clicking the Deploybutton and selecting from the list of connected machines to deploy to.
Manual Backup Instructions
To manually backup local Automate data:
- 1. From the Task Administrator, select System -> Backup. A dialog box titled Backup Automateappears as shown below.
Image
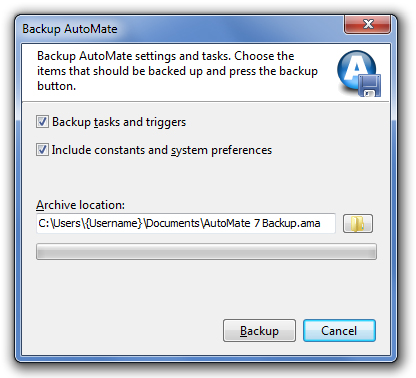
- There are two options to select from when backing up Automate:
Backup tasks and triggers – If selected, all managed tasks that are located in your Default Managed Tasks Location (specified in System -> Options -> System tab) will be included in the backup (this option is enabled by default).
Include constants and system preferences - When selected, all created constants and global system preferences which are specified in System -> Options will be included in the backup (this option is disabled by default, although it is recommended that it is enabled as well in order to perform a complete backup of imperative data). - In the parameter labeled Archive Location, enter the path and file name in which to save the archive file or you can save to the default archive location which is pre-entered. If using Windows Vista or Windows 7, the default archive location is:
C:\Users\{Username}\Documents\AutomateBackup.ama
If using other Windows XP, Windows NT or Server 2003, the default archive location is:
C:\Documents and Settings\{Username}\My Documents\AutomateBackup.ama - After entering your preferences, click the Backup button. Automate will then attempt to backup the specified settings into a compressed file with a .AMA extension. The default name for the archive is AutomateBackup.ama.
To manually backup remote Automate data:
- From the Task Administrator, connect to the desired remote Automate Runtime via File -> Connect.
- Once the connection is established, system tasks and preferences can be remotely viewed or modified and backups can be performed in the same manner as if you were performing them locally. From this point, you can follow the manual backup instructions above. The dialog box that appears should contain the IP address or computer name of the remote machine confirming that you are performing a remote backup as shown below.
Image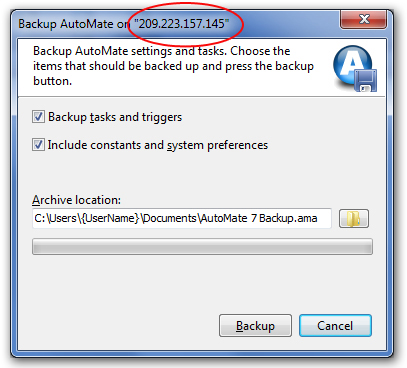
Automatic Backup Instructions
To create a task that performs automated backups:
- From the Task Administrator, create a new task.
- If using the Add Task Wizard to create the task, after naming the task, click Next and click the Create Steps button on the next screen. Otherwise, right click the newly created task and select Steps to open the Task Builder.
- From the Available Actions pane, expand the Automate folder and double-click the Backup Automate action or drag it into the Steps pane. The properties dialog appears with the Generaltab, as shown below.
Image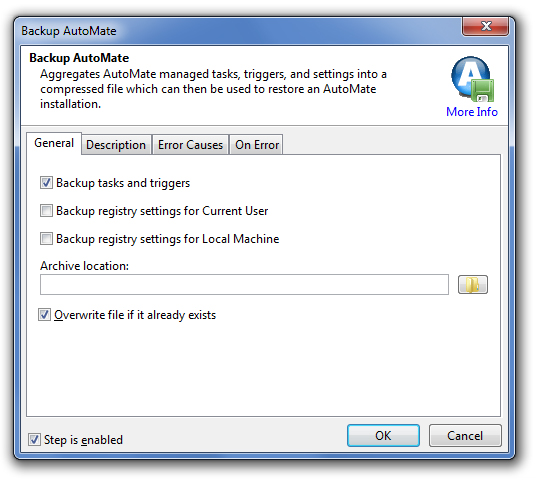
- Select the desired check boxes to specify the type of backup. The available options are:Backup Automate
Backup tasks and triggers- When enabled, managed tasks and any associated triggers will be included in the backup. This option is enabled by default.
Backup registry settings for Current User- When enabled, registry settings for the current user such as toolbar arrangement and font settings will be included in the backup. This option is disabled by default.
Backup registry settings for Local Machine - When enabled, registry settings for the local machine such as system options, task execution speed and error handling will be included in the backup. - In the Archive location field, enter the path and file name in which to save the archive file. You can use the Folderbutton to navigate to the desired location.
NOTE: When editing remote preferences that specify a drive location (such as the Archive location field, the Explorer window that comes into view reflects the local machine's drive. In such cases, be sure to enter the drive location relative to the remote machine. If entering a network location, make certain to specify the path via UNC (Universal Naming Convention) format as opposed to a mapped drive. For example X:\foldername\filename.ama should be \\servername\foldername\filename.ama. This is because mapped drives are created and/or connected when the user is logged on but are not accessible when the machine is in a logged off state. If the task executes in the background while the machine is logged off, it will fail to recognize the mapped drive. However, locations specified in UNC format are accessible even when the machine is logged off. - After entering all preferences, click Ok to save and close the properties dialog and save and close the Task Builder.
- Add the appropriate trigger to allow the task to run automatically.
- To deploy the task to remote Automate installations you are connected to, from the Task Administrator, highlight the newly created task and click the Deploy button located on the toolbar, as shown below.
Image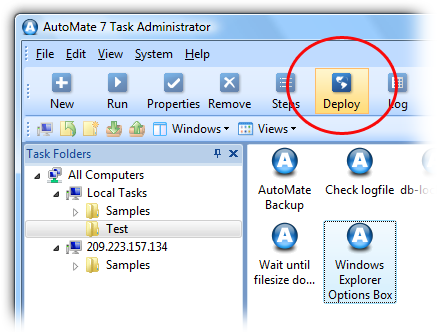
- In the Deploy dialog box (shown below), select one or more machines from the list of connected machines to deploy to.
Image
Data Restoration Instructions
Whether a manual or automated backup was initially performed, all Automate backup data can be easily restored by selecting System -> Restore from the Task Administrator. To restore remote Runtime data, first connect to the desired Runtime then select System -> Restore. All data will be restored to the proper location making the procedure a simple and straightforward.
Conclusion
Because managing backup operations can be tedious, complicated, and time-consuming, one may not comprehend the importance of data backup and recovery until a disaster happens. Automate is the perfect all-in-one solution. You can essentially use Automate’s easy drag and drop functionality to create tasks that perform all your important daily data backups and minimize the risk of complete loss of data. In addition, you can use Automate to back itself up to ensure your tasks and settings are safe and secure.