A Robot Schedule forecast shows you the run activity scheduled for all Robot Schedule jobs over a time period that you specify. Robot Schedule uses the job schedule, job completion history, and any information you add for user jobs, remote prerequisites, and members of remote groups to make its forecast. If you wish, the forecast can also include a run-time analysis of each active subsystem, which uses the subsystem’s description to predict job queue wait time.
Internal Forecasting
Robot Schedule creates a special internal forecast, *INTERNAL, automatically every time it starts and in 12-hour intervals at 11:00 and 23:00. The forecast is for a 24-hour period, and you can always view your forecast for the next 24-hour period in the Schedule Activity Monitor™.
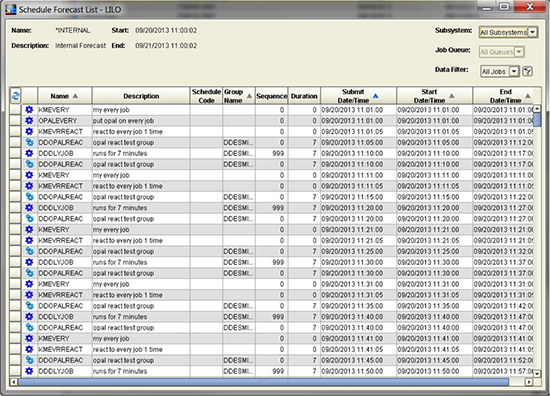
Figure 1 – Internal Forecast for 24-hour timeframe accessed from Forecast Objects.
Create a forecast by choosing Forecast Length or Forecast Period. Forecast Length allows you to specify a length of time in days or hours. With Forecast Period you can specify a date and time range. For example, you could generate a Forecast Period for your weekend or holiday schedules. Specify any date and time way ahead and be prepared.
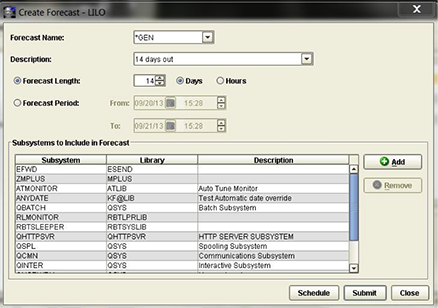
Figure 2 – Creating a forecast that specifies a Forecast Length of 14 days.
External Forecasting
If you are forecasting a job that has a prerequisite on a remote system, you can add the prerequisite job schedule to get a more accurate forecast by adding it to the Schedules for Forecasting. This can also include a remote group member or a user job.
Select “Remote Prerequisite” if you are forecasting a job that has a prerequisite on a remote system. By adding the prerequisite job schedule, you'll get a more accurate forecast.
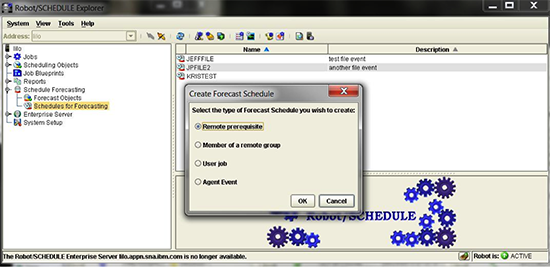
Figure 3 – Creating a forecast schedule with remote prerequisites.
Select “User Job” to add a user job to the forecast. A user job is a job that runs outside of Robot Schedule. Enter the “User Job Name” and “Description” for the forecast schedule you are creating.
Since Robot Schedule Enterprise is fully integrated into the Robot Schedule Explorer interface, select “Agent Event” to add an agent event to the forecast. An agent event is an event (e.g. file/directory change or process started/ended) that occurs on a system connected through Robot Schedule Enterprise.
Forecasting Shortcuts
Once you’ve created your forecast you can put the results into an Excel spreadsheet. View the forecast then right-click to “Select All” and copy it to your clipboard. Bring up Microsoft Excel and paste your forecast there. Now you have a great report to email to anyone who needs the information.
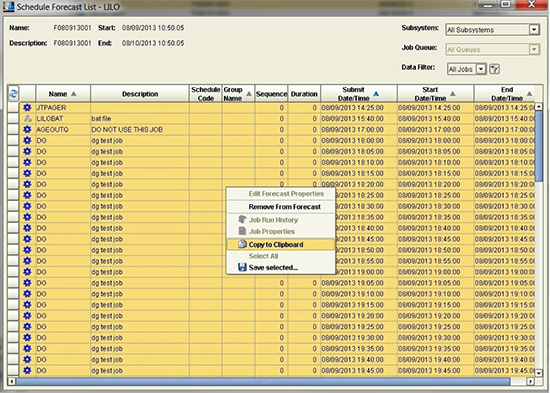
Figure 4 – Copying a forecast schedule into an Excel spreadsheet for easy reporting.
If you want your forecast to run on a schedule within Robot Schedule, you can use the RBTBLDFCT command in ROBOTLIB to build a new forecast or replace an existing forecast.
Some users prefer to manually check off jobs on a daily basis just as a way to verify that things ran. The automated check-off list in the SAM™ automates the process and should help to eliminate this need. Simply view the completed/failed job list on the right. Jobs that completed normally are automatically indicated by a green checkmark, while jobs that terminated display a red “X”.

Figure 5 – Schedule Activity Monitor (SAM™) displaying the job status.
Forecasting is especially beneficial if you have a number of external events that trigger events in Robot Schedule. Robot Schedule won’t know about these external events unless you create a forecasted job in Robot Schedule.
Get Started
If you really want a clear picture of your job stream, knowing how to create forecast jobs is key. Give it a try today by requesting a free trial of Robot Schedule.