In the last five years, container technology and management frameworks like Kubernetes and OpenShift have seen massive adoption—so much that they’re almost becoming the default platform for new applications and services. And the fact that it happened around the same time as broad adoption of public cloud is no coincidence. The container deployment model offers component autonomy, elasticity, and scalability in a way that no other framework has done before. Characteristics like these are extra valuable in a world of on-demand provisioning.

But to reap the benefits, you need to adopt new ways of managing and optimizing your environments and their underlying resources. Consider these best practices for how to manage the performance and resource planning of container workloads, based on my experience working with organizations across many different industries.
What is Containerization?
Let’s start with a quick background. Even though you may already be familiar with concepts discussed in this section, it’s always useful to level-set and make sure everyone has the same understanding.
A fundamental building block of a container framework is the container itself. Containers offer the same level of resource management, isolation, and portability as other virtualization technologies. It’s built on native capabilities of the Linux operating system, which leads to a considerably lower resource overhead and faster provisioning than other virtualization technologies.
The low overhead and quick provisioning are key factors to the wide adoption of container technologies. This has allowed software designers to split application logic into smaller, autonomous components—often referred to as microservices—without concerns for resource efficiency. An application no longer must fit into a single monolithic resource pool with pre-allocated resources but can be distributed across multiple containers that can be provisioned individually based on demand.
Operating container-based applications at scale and in production turned out to be a non-trivial task, and the rise of container technology was soon followed by different management frameworks designed to simplify the process. Kubernetes became the de-facto standard offering a range of functions to enable automation, scaling, and operations across a cluster of hosts. A fundamental premise of Kubernetes is “desired state management”, which means that you feed the service a description of the ideal state and leave it to the cluster services to provide it. OpenShift is another popular management system, designed to extend Kubernetes with additional capabilities. The specific differences between the two frameworks are another story, but all the recommendations and best practices I’m sharing apply to both Kubernetes and OpenShift.
How Does the Use of Containers Impact Planning?
The use of containers and frameworks like Kubernetes has a wider impact than being just another platform to manage. The distributed architecture and self-orchestrating nature of Kubernetes and OpenShift will force you to also revise your traditional approach to capacity optimization and planning. What used to be a fairly static set of dedicated resources—physical or virtual—assigned to an application is now replaced with a common resource pool shared across multiple nodes in a cluster. This renders many of the foundational principles of traditional planning obsolete:
- Limited validity of snapshots. Any method based on building a representative baseline from snapshots will struggle due to the momentary nature of containers and the frequency of change.
- Increased complexity. A larger number of nodes leads to exponential growth in possible placements and alternatives for optimization. Methods relying mainly on human decision making will struggle to keep up with the scaled complexity.
- Predictability of the scheduler. Despite the ambition to provide self-orchestration based on a “desired state,” you still need to provide manual estimates of resource requirements for your different workloads to help the scheduler find the optimal balance between performance and efficiency. This makes an initial calibration exercise key to creating an accurate capacity model of the environment.
These differences all need to be taken into consideration when you design your planning strategy. Throughout the rest of this article, I’ll discuss the key elements to a successful strategy and a step-by-step approach to implementing it.
Keys to a Successful Optimization Strategy
Kubernetes offers a handful of settings that each play an important role in how resources—CPU and memory—are allocated to containers and pods in a cluster. Getting them right will increase the performance and scalability of your current services. It will also result in a cluster that behaves in a more predictable way, allowing you to become more proactive by forecasting future behavior.
Requests
‘Requests’ is an estimate of the amount of resources a pod will consume when it runs and has to be set manually. This information is used to create maps of how much resources a node has available based on the pods that have already been allocated. The map is used by the scheduler to find nodes for new provisions.

Limits
‘Limits’ determine the maximum amount of resources that can be used by a container at runtime. If you don’t specify the ‘Limits’ parameter, Kubernetes assumes that it’s unbound and that a container is allowed to consume all the resources available on a node.
Quotas
Kubernetes allows you to group containers into namespaces (OpenShift uses the term projects). ‘Quotas’ set the limit for how much CPU and memory resources that a namespace/project can request. It offers a convenient way to regulate the amount of resources a tenant (business application, customer, department etc.) can allocate collectively. When the quota is reached, any requests from that tenant are denied and the cluster behaves as if it’s full.
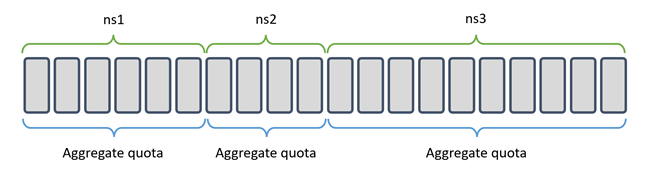
The ‘Quotas’ parameter is not mandatory. But when it is set, all the pods in that namespace are forced to also specify ‘Requests’ and ‘Limits’ on pod level.
Optimization in 3 Steps
Let’s look at how to use these settings in practice. There are three essential steps towards better management of your Kubernetes or OpenShift capacity. As we have concluded, the platform is designed to provide self-orchestration and dynamic resource allocation out of the box. It will mostly do a great job, but there are some things you should do to further improve those mechanisms.
Step 1: Optimize Cluster Capacity
The first recommended activity is focused on calibrating the settings of the cluster to better reflect actual behavior. Several parameters that impact how the scheduler behaves are set manually or are not even mandatory. If these are incorrect, Kubernetes will likely not be able to provide the consistent performance and efficiency that you desire.
The most straightforward way of identifying this is to compare the currently allocated resources—CPU and memory utilization—of a pod to the ‘Requests’ setting:

Scheduling an automated report that calculates and lists significant deviations will be a useful tool for calibrating your individual pod settings.
- Focus your attention on deviations of more than 20% (positive or negative) as these are likely to impact the overall performance of the cluster.
- Positive deviations (> 20%) indicates that the demand is significantly larger than expected and should be dealt with first as these are more likely to impact current performance.
- Negative deviations (< -20%) indicate over-provisioning, resulting in low workload density and cluster inefficiency.
- The report should also identify instances where the setting is missing as such instances present a potentially high risk.
By identifying the root cause behind each item on the list, you can make the required corrections—adjust the ‘Requests’ setting to better reflect actual demand, calibrate the ‘Limits’ setting to curb resource intensive pods, etc. This is an iterative process that will gradually reduce the list. The shorter the list, the closer you are to an optimized cluster. The process should be repeated on regular intervals. The exact frequency is dictated by the dynamism of your workloads and overall rate of change, but at least a weekly review is a good starting point.
Step 2: Proactive Cluster Sizing
Now that we have a decent handle on the sizing of the individual pods, we can move the attention to sizing our cluster.
We can use the actual utilization—or perhaps a derivate of it, like a moving average to smooth it out slightly—and compare that to the total capacity of the cluster. But we can also use the estimate that we specified in the ‘Requests’ parameter of each pod in the previous step. Both values work, but ‘Requests’ has a couple of advantages over actual utilization:
- The actual values tend to vary more. The variations are mostly caused by random events that aren’t significant to our planning. But aggregating data from a potentially large number of pods, the random behavior can get exacerbated and trigger actions that aren’t warranted.
- A steadier indicator like the sum of ‘Requests’ allows you to use simpler methods of regression analysis for forecasting.
- ‘Requests’ better reflect the intentions for the pod, as it was manually defined by someone with potential insights about future plans.
If we have provided our best estimates for the individual pods in step 1, the total cluster utilization can be calculated using the following formula:

A cluster utilization of less than 40% should alert us to consider shrinking the cluster by reducing the number of nodes. Vice versa, a cluster utilization of more than 80% means that we should consider adding more nodes to expand the cluster. Expanding is more critical, since not doing it means that we may not be able to service all our tenants.
Step 3: Planning Long-Term
We now have indicators that tell us when to consider growing or shrinking the cluster and we can do this proactively before the services are impacted. But if we are asked to provide a forecast of how the cluster is expected to grow or shrink in the coming years, we probably don’t have enough insight about growth over time to be able to tell.
A useful metric for this is ‘Commitment level’. Assuming that you have defined ‘Quotas’ per namespace/project as described earlier, those values can be used to track how much of your resources have been committed to the different tenants—whether those are applications, customer, departments, etc.—but also the overall commitment. Comparing those values to the total available capacity gives the commitment level. Breaking down the demand by tenant helps us do even more granular forecasting.

By calculating and recording the commitment level on a regular schedule, both per namespace/project and overall, you can identify patterns of growth and use those to forecast future cluster resource requirements.
How Can VCM Optimize Kubernetes and OpenShift Environments?
The Fortra VCM product contains everything you need to manage and optimize your Kubernetes or OpenShift environment. It offers data collectors to capture all the required information about clusters, nodes, pods, containers, and processes at collection rates down to 1 second. It can also federate monitoring data directly from Kubernetes or third-party monitoring data sources such as Prometheus.
All the container related data is available in the different components of the products together with your other workloads—regardless of where they are hosted. Physical, virtual, or public cloud infrastructure is available in the same user interface.
VCM also offers a set of predefined dashboards specifically developed for Kubernetes and OpenShift providing the three steps of optimization and analysis described in this article.
See How VCM Can Support and Optimize Your Environment
Our experts are ready to show you how you can optimize Kubernetes and OpenShift with VCM in a collaborative demo session—tailored to your needs.